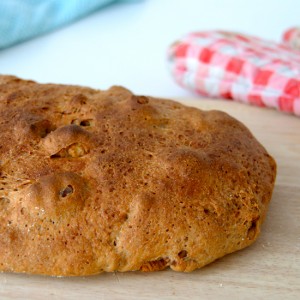
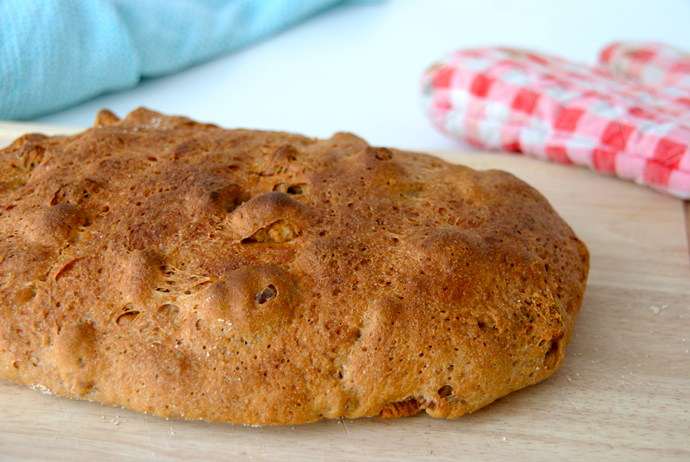
 When my dear boyfriend first saw this picture, he mentioned that my fantastic spelt bread with walnuts and figs reminded him of some warty animal, like a toad.
Hmm… not sure what to think of that…
I don’t think it looks like a toad… I think it looks more like this big guy! It’s the figs on top. They look like mean little eyes. But don’t be scared! I didn’t make my bread this mean-looking on purpose and I didn’t include the step “put two figs on top to look like mean little eyes” in the recipe, so your bread will probably look a lot friendlier than mine did.
However, mean look and all, it was incredibly good!
The crust was gorgeously crisp and chewy and the crumb was perfectly fluffy without tasting too yeasty.
I can’t tell you enough how good figs are. Especially in bread. I just love how they add a sweet and chewy texture to it and how they work great with both sweet and savory toppings. Try this bread with Nutella or some smoked salmon. It’s just the best. And while the figs give you something nice and sweet to chew on, the walnuts ensure a crispy nuttiness throughout the bread.
If you don’t have figs or walnuts lying around the house or if you start wheezing whenever you smell a tree nut, try substituting them with dried dates, cranberries or raisins and some almonds, pecans or hazelnuts (forget about these in the wheezing-case, of course). Basically, anything will work. You could even substitute the spelt flour for whole wheat flour.
Figs come in a variety of different shapes and sizes. I usually take 7 random figs and quarter them. The walnuts I just leave whole.
Furthermore, there is not much technique in this bread, apart from the kneading. I use a special kneading technique that I picked up when I was watching Masterchef Australia. I just love that show! Especially the masterclasses. I’m usually not into cooking competitions, as I think most are hosted by mean judges and focus mostly on the contestants instead of the food.
But Masterchef Australia is different…
When my boyfriend and I were backpacking through Vietnam, we would watch it almost every afternoon after we got back to our hotel room. Tired and dusty from exploring, we’d crash onto our squeaky bed and watch all those happy people eating amazing food. It was either Masterchef Australia or Jeremy Wade’s River Monsters. Shows like that made us feel right at home.
Anyway, me and my boyfriend were watching a Masterchef Masterclass the other night and the guest chef was Phillippa Grogan, who made a Walnut and Fig Loaf with Wheatmeal Flour. I was immediately inspired and intrigued by her kneading technique. Instead of working the dough a lot, she just stretched it out a couple of times and rolled it right back up.
I’ve tried this technique (and her suggested filling) for my own spelt bread recipe, and it worked like a charm. Just slap the dough on a lightly floured surface and stretch it into a long, thin rectangle, pinning it to the countertop with one hand and stretching with the other. Once you’ve done that, simply roll the rectangle up, turn it seam side down, turn it 90 degrees (so the long side of the rolled up bread is ready for stretching) and repeat 3 times.
Not really hard work, although I did roll up my sleeves for this one.
After your dough has been kneaded, it’s time to add the walnuts and figs to it, which is easy as pie!
Or bread, in this case…
Just pat the dough down into a broad rectangle, add the filling ingredients (don’t forget to add some love!) and roll the dough right back up again. Repeat the kneading method a couple of times to incorporate the goodies and your dough is ready for its first rise.
The first rise takes an hour, in which you knock the dough back every twenty minutes (just by pushing it around on the countertop). After it’s been knocked back the third time, you simply shape the bread by pressing it into a rectangle and rolling it up again. You then leave the dough to rise, undisturbed, for another hour. After that, it’s ready to bake!
Not too much work for a gorgeous little loaf, right?
Enjoy! You deserved it after – cough cough – SOO MUCH kneading!
- 300ml (or 1¼ cup) water (just above body temperature)
- ½ teaspoon granulated sugar
- 1 teaspoon active-dry yeast
- 500g (or 4 cups) spelt flour, plus extra for dusting
- 1½ teaspoon table salt
- 7 dried figs, chopped
- 90g (or 1 cup) whole walnuts
- semolina flour for dusting
- ice cubes
- Pour half the water into a small bowl and stir in the sugar. Sprinkle the yeast in, stir a couple of times and let sit on the countertop for 10 minutes.
- NOTE: as you probably know, yeast is a live organism that that needs some love and caring. By pampering it with a nice warm sugar bath, the yeast gets activated and will start to foam and bubble.
- In the meantime, stir together the flour and the salt in a large bowl. Make a well in the center of the flour mixture and pour the rest of the water into the well. When the yeast is activated, add the yeast mixture into the well and mix with one hand until a smooth dough forms. You may want to add more water or flour if the dough feels either too dry or too wet. Just don't add too much, as this will affect the bread's texture!
- Place the dough on a lightly floured countertop and knead it by stretching it into a long rectangle, pushing away with one hand and stretching down with the other. Roll the rectangle up, turn 90 degrees, turn it seam side up and repeat this step (stretching, rolling and turning) three times until the dough looks smooth.
- Using your hands, pat the dough down into a flat rectangle and scatter the walnuts and figs over the dough. Roll the dough like you would a Swiss roll, tucking the filling in as you roll the dough into a log. Turn the dough 90 degrees and seam side up. Again, press the dough into a flat rectangle and roll up. Repeat this process of patting and rolling until the walnuts and figs are showing on the outside of the rolled dough.
- Start the first rise of the dough: place the dough in a bowl and cover the bowl with cling film. Leave to rise in a warm, draft-free place for twenty minutes. After twenty minutes, you need to knock back the dough. This means taking it out of the bowl and pushing it around on the countertop with the heel of your hand a couple of times to release air from the dough. This will develop the gluten structure.
- This process – letting the dough rise for twenty minutes and knocking it back - needs to be repeated two times. So in total, the dough will rise for sixty minutes and is knocked back three times.
- After you’ve knocked the dough back for the third time, you can shape the loaf by stretching it into a long rectangle and rolling it up again. By doing this three times, you will give the dough a uniform structure.
- For the final rise, dust a clean chopping board with semolina flour and place the dough, seam side down, on top. Place the board (with the dough) inside a clean, large plastic bag and make an airtight enclosure by tucking the open end of the bag under the board. Place the entire thing in a warm, draft-free place for one hour, until the dough has doubled in size.
- In the meantime, preheat your oven to 250°C/480°F (standard oven setting). Place a baking stone or a baking sheet in the oven while it preheats and place a baking tray underneath the stone/sheet.
- Once the dough has risen, take the baking stone or the baking sheet out of the oven, sprinkle it with semolina flour and carefully place the dough on top of it. Place the stone/sheet back into the oven and throw a few ice cubes into the baking tray to create steam (crust-enhancing!). Quickly close the oven door and turn the oven down to 200°C/390°F. Bake for 25 minutes.
- After 25 minutes, set the oven door ajar with a wooden spoon and bake for another five minutes in order to let the steam escape and the bread to form a nice crust. You know the bread is done when it sounds hollow when tapped with a wooden spoon. Take the bread out of the oven and leave it to cool on a wire rack.
