It’s almost Christmas! Candles, Christmas lights and over the top Christmas trees are everywhere, ‘All I Want For Christmas’ has become the national anthem and strangers smile at you for no particular reason at all. Well, unless you get into their way at the supermarket. Then they’ll just shove you out of the way and throw you a mean look.
Ah, Christmas…
The time of year when wearing as much glitter as Dolly Parton is totally acceptable. Just like dangling huge Christmas ornaments from your ears… So classy!
I still haven’t decided what I’m going to wear to all the Christmas parties I’m going to this year – in fact, I’ll probably end up crying in front of the wardrobe at some point, because what girl ever has anything to wear? – but I do know one thing… I’m going to make this cake again!
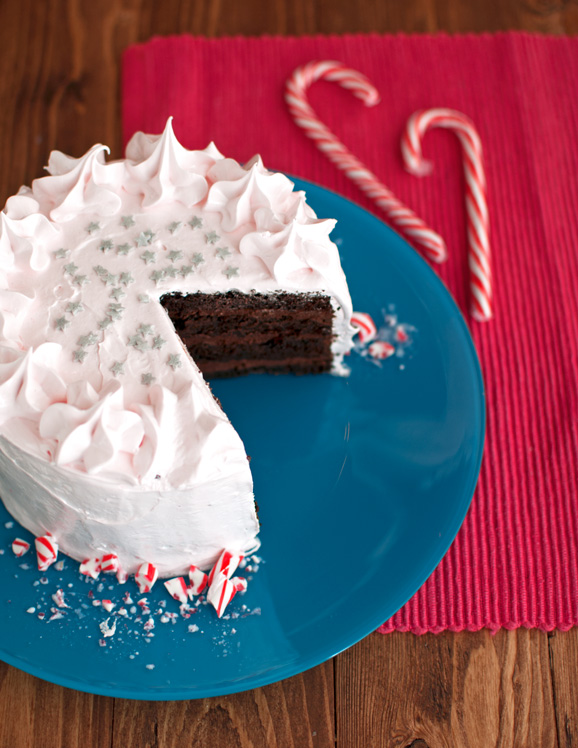
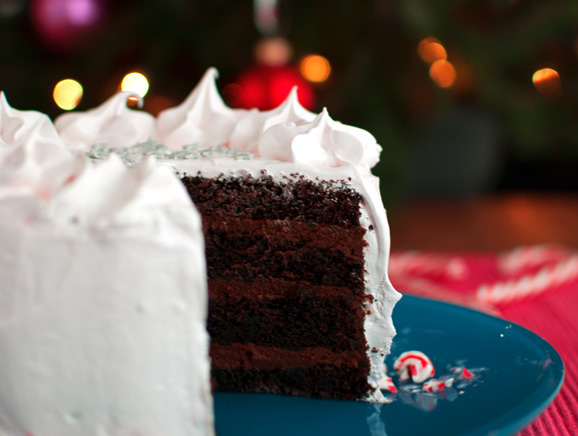
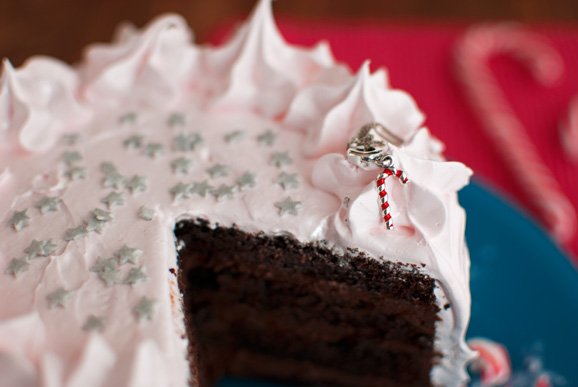
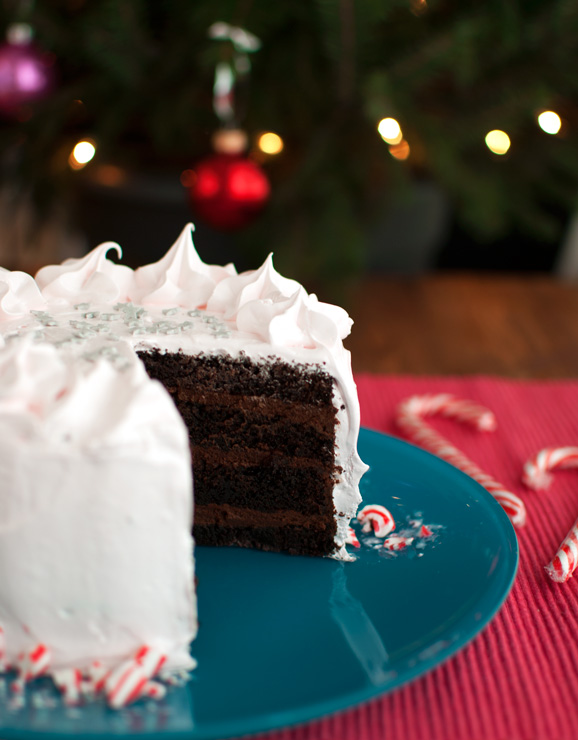
It’s the perfect Christmas cake. It’s made up out of four rich, dark chocolate cake layers, three velvety layers of whipped chocolate ganache and the most gorgeous candy cane frosting I have ever tasted! This cake actually reminds me of a perfect Christmas night, when the world is dark and covered with a thick blanket of freshly fallen snow.
Whereas most candy cane frostings are really just buttercream with some crushed candy canes mixed in, this frosting is actually made with melted candy canes.
And it’s dreamy.
It’s fluffy.
It’s ridiculously easy!
In other words, perfect for Christmas, because it enables you to wow (or rather: WOW) your family and friends without having to go through too much trouble in the process!
This frosting is basically a 7-minute icing (or ‘boiled icing’) made with candy canes. 7-minute icing is basically an Italian meringue, which means – as I explained in my post on Italian Buttercream – it is made by cooking up a sugar syrup and pouring it into some egg whites while mixing continuously to prevent the eggs from scrambling.
That’s about it.
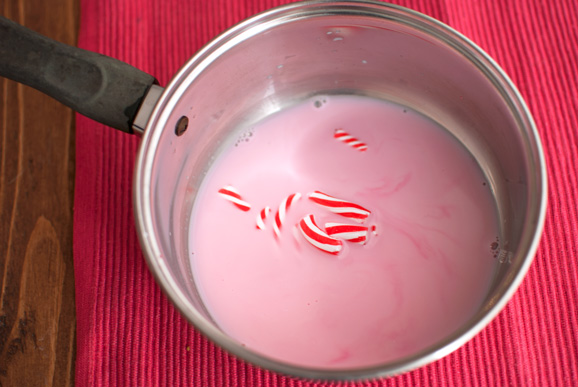
And since candy canes are just sugar and a little bit of food coloring, you can use this much loved Christmas candy instead of regular sugar! All you need to do is crush the canes with a rolling pin and throw them in a saucepan with a little water and some regular sugar. Because yes, I did use a little regular sugar too. You see, besides food coloring, candy canes have added flavors, such as peppermint or strawberry. Because I was worried that the flavor of all those candy canes would be a little too much in the frosting, I only substituted half of the sugar for this recipe with candy canes.
It worked brilliantly! Like a good Christmas frosting should!
I used strawberry flavored candy canes, but I developed this recipe so you can also use the peppermint or even vanilla ones. Any of these flavors will go with this cake. And all of those flavors will make a great frosting!
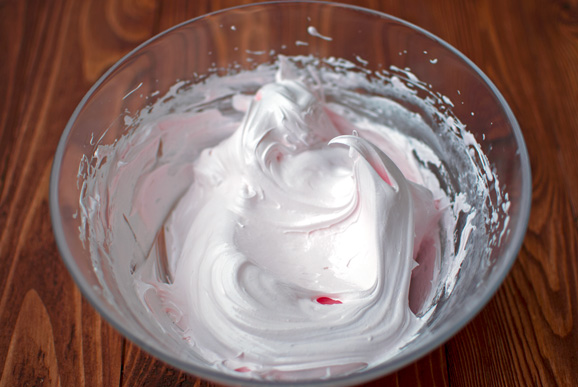
In fact, you only need to worry about one thing! Only use the traditional red and white candy canes. I guess you could also use an all red kind or a white and blue kind or something, but keep in mind that the color of the canes is going in the frosting too! My candy cane frosting turned out a beautiful light pink. However, if you decide to use green and red candy canes, your frosting will probably take on an ugly brownish color. If you go for the blue and white canes, the frosting will come out a little blue.
I think the soft pink was just perfect! It was gorgeously thick and fluffy and it had a delicious sweet hint of strawberry to it. To complement the strawberry flavor of the frosting, I decided to imbibe the cake with a simple raspberry syrup. Just to jazz it up a little. If you decide on a peppermint-chocolate version of this cake instead, just omit the raspberry liqueur I’m using in the recipe. The simple syrup will still add a little moisture to the cake.
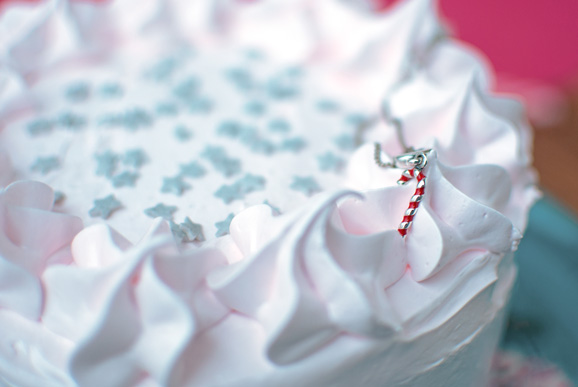
Just look at that beautiful frosting! It’s so dreamy! If Candyland was an actual place, the clouds would be made out of this candy cane frosting!
Just look at those beautiful frosting roses!
Oh, and that little trinket on top of the cake…?
Well, that’s the star of my first ever giveaway! And isn’t Christmas the perfect time to have a first giveaway?
I stumbled upon this cute, little, candy cane charm a few weeks ago and it immediately inspired me to do a Christmas themed giveaway. It just makes the perfect little Christmas gift. This silver charm may be small, but its cuteness obviously makes up for that!
Besides, one of the things you learn growing up is that small gifts are usually the best!
And this little beauty just puts a smile on my face every time I see it!
It was so much fun to photograph and draping it over those fluffy frosting roses… I put it on a little silver chain to give it some ‘context’, but it is a charm, so you can wear it in a lot of different ways! You can do the same as I did and put it on a chain to wear around your neck, you can add it to a charm bracelet or you can even go with that whole asymmetric earrings trend and hang it from one of your ears!
And if you’re not the jewelry wearing kind, it makes a great gift for a loved one!
To enter this giveaway, just answer the following question in the Giveaway Widget below: what is your favorite Christmas song?
You can increase your chances of winning by also liking me on Facebook and tweeting about this giveaway!
This giveaway is open until Friday, December 27th, 2013 at 12:00AM UTC+1. Winner will be chosen randomly and announced on this post. I will email the winner and if the winner doesn’t respond within 48 hours, a new winner will be chosen.
THIS GIVEAWAY HAS BEEN CLOSED.
Back to the awesome Christmas cake!
For a while I was thinking that maybe I should call it ‘Starry Night Cake’, because I sprinkled some little silver stars on top. But then I really loved the sound of ‘Candy Cane Cake’ too, which also happened to be a very descriptive title. However, I was feeling creative, and when you’re feeling creative you want to come up with a fun name, not just a list of ingredients.
So, for future reference, I’ve decided to call this cake the ‘Christmas Cloud Cake’.
Seems appropriate, right? Just look at those beautiful little peaks!
Which reminds me…
… there’s a huge slice of cake in the fridge with my name on it!
Enjoy guys!
This recipe is incredible!
And don’t forget to enter the giveaway!
- 45g (or 1½ ounce) bittersweet chocolate, chopped
- 180ml (or ¾ cup) boiling water
- 140g (or 1 cup + 2 tablespoons) all-purpose flour
- 110g (or ¾ cup + 3 tablespoons) cocoa
- 1 heaped teaspoon baking soda
- ⅜ teaspoon baking powder
- ¼ teaspoon salt
- 1½ large eggs, at room temperature
- 90ml (or ¼ cup + 2 tablespoons) sunflower oil
- 180ml (or ¾ cup) milk
- ⅜ teaspoon vanilla extract
- 340g (or 1½ cup + 3 tablespoons) granulated sugar
- 60ml (or ¼ cup) water
- 50g (or ¼ cup) granulated sugar
- 1 teaspoon of raspberry eau de vie or raspberry liqueur
- 200ml (or ¾ cup + 4 teaspoons) whipping cream
- 100g (or ½ cup) granulated sugar
- 150g (or 5 ounces) dark chocolate, chopped
- 3 extra tablespoons of whipping cream
- 100g (or a little over 3 ounces) candy canes, crushed
- 100g (or ½ cup) granulated sugar
- 60ml (or ¼ cup) water
- 2 egg whites
- pinch of salt
- Start by preheating the oven to 175°C or 350°F (standard oven setting). Spray a 15-cm (6-inch) cake pan with baking spray and line the bottom and sides with baking parchment, using the baking spray to stick the parchment to the sides of the pan. Pour the water over the chocolate in a heatproof bowl and stir to dissolve. Set aside. Combine the flour, cocoa, baking soda, baking powder and salt in a small bowl and stir to combine.
- In a large bowl, beat the eggs with a mixer fitted with the whisk attachment until foamy. Keep mixing and slowly drizzle in the oil. Once the oil is fully incorporated, add the milk and vanilla to the chocolate-water mixture. Pour the now cooled chocolate mixture into the egg mixture. Add the sugar and mix until the sugar is completely dissolved.
- NOTE: to check whether the sugar has dissolved, rub the batter between your fingers. If you can’t feel any sugar grains, the sugar has properly dissolved.
- Stop the mixer. Add the flour mixture and, using a rubber spatula, gently fold the dry ingredients into the wet ingredients. Once the flour mixture has been absorbed, give the batter a quick whiz with the mixer to get rid of any lumps. Pour the batter into the prepared cake pan and bake the cake until a tester inserted in the center of the cake comes out clean, about 80 minutes. You may need to place a sheet of aluminum foil over the cake after 45 minutes if it’s browning too fast.
- Transfer the cake to a wire rack and leave to cool for twenty minutes in the pan before turning the cake out. Leave to cool to room temperature on a wire rack, then wrap with plastic wrap and chill in the fridge for at least 2 hours or overnight.
- In a small saucepan, combine the sugar and water. Heat over low heat, stirring to dissolve the sugar. Once the sugar has dissolved and the syrup is clear, take it off the heat and pour it in a mug to cool. Add the eau de vie or liqueur. Cover and place in the fridge until use.
- In a small saucepan, combine the cream and sugar. Heat over low heat, stirring to dissolve the sugar, then crank up the heat. While the cream is heating, place the chopped chocolate in a heatproof bowl. As soon as the cream has reached scalding point, pour it into the bowl with the chocolate. Allow to sit undisturbed for 1 minute, then whisk until smooth. If the chocolate doesn’t melt properly into the cream, gently heat the mixture in the bowl of a double boiler, stirring until smooth (for more information, check out: ‘Faking a Double Boiler’ under ‘Basics and Tips’). Take off the heat and allow to cool to room temperature.
- Once the ganache has cooled, use a mixer to whip it up. It should lighten in color and thicken. If you overwhip the ganache, it becomes too thick to spread. if this happens, add the extra cream to make it spreadable again. Start assembling the cake as soon as the ganache filling is ready.
- Place the cooled cake on a cutting board. Get eye level with the cake and, using a serrated knife, cut the cake in half horizontally. I usually place my left hand on top of the cake while cutting with the right. I feel this gives me more control. Cut both of the cake halves in half again, so you end up with 4 cake layers. Reserve the bottom layer for the top of the cake (it is nice and flat).
- Using a pastry brush, brush the top layer of the cake with the raspberry syrup. Place one third of the ganache filling on top of the cake layer and use an offset spatula to push it to and over the sides of the cake, creating a frosting ‘overhang’ (for pictures: check out my recipe for Crowned King’s Cake). Try not to pull the ganache towards you, as the ganache may come off again. Place another cake layer on top of the ganache and press it down lightly.
- Repeat the brushing and frosting process with the second and third layer, then take the layer you reserved for the top on top (flat side up) and press it down lightly.
- Using an offset spatula, smoothen out the frosting overhang on the sides of the cake. Try to make the sides of the cake as straight as possible. Place the cake in the freezer for 45 minutes to firm up or in the fridge for 2 hours or overnight.
- Combine the candy canes, sugar and water in a small saucepan. Heat over low heat, stirring to dissolve the sugar and the candy canes. As they heat up, the candy cane will clump together. Don’t allow the water to boil before the candy cane has completely melted. It takes some time, but eventually the candy will melt. In the meantime, combine the egg whites and salt in a medium-sized bowl. Mix until foamy, about 1 minute.
- Once the candy has melted and the sugar has dissolved, crank up the heat and clip on a candy/sugar thermometer. Once the mixture reaches a temperature of 115°C/240°F, take the pan off the heat and immediately pour the hot syrup into the egg whites, mixing continuously to prevent the eggs from scrambling. Try not to pour the hot syrup onto the whisk attachment of the mixer, as the syrup may splatter. Once all the syrup has been added, whip the mixture until it holds stiff peaks, then whip for another 5 minutes. The frosting should be thick and glossy.
- Take the assembled cake out of the fridge and, using an offset spatula, frost the sides and top of the cake with a thin layer of frosting. Again, try pushing the frosting to get it to the place where you want it to go, instead of pulling it towards you. Place the remaining frosting in a piping bag fitted with a large star tip and pipe a circle of playful roses on top of the cake. Sprinkle silver sprinkles in the center of the circle and sprinkle crushed candy canes around the base of the cake.
- Leave to come to room temperature for about 3 hours before serving or place in the fridge for up to 8 hours. Again, allow to come to room temperature before serving.





I wish you could have a giveaway for a slice of this cake. Geez,It’s so tasty looking! SIGH
Thanks Rachel! It really was to die for 🙂
I am going to make this cake. It may not be in time for Christmas, I have enough stress, but let there be no doubt I am going to make, strike that, attempt this cake. I just hope I don’t end up crying on any day as I have not made anything this complicated and I am scared of the icing. But it is without a doubt the most delicious thing I have seen!!! Wish me luck!
Hi Robin! I’m so glad I have inspired you to do something out of your comfort zone! Don’t worry about this cake, though… Just stick to the suggested schedule and you should do fine!
Just make sure you have a sugar thermometer (I got mine for less than $10) and stock up on candy canes 😉 Good luck!
Thanks! Stupid question: Is a sugar thermometer the same thing as a candy thermometer which is what mine says it is? Thanks!
Yup! A sugar thermometer is exactly the same as a candy thermometer 😉 Good luck! And please let me know how the cake turned out!
I feel silly, I can’t see the recipe or any place to click to get it? Help!
Hi Christina, thanks so much for letting me know! After an update, the recipe indeed disappeared from the site. I just updated the post again and the recipe is back where it should be, right below the post 🙂
I am going to make this cake , it’s Good
It sure is 😉
Every time I see the pictures I start to drool lol everything on your site looks so beautiful and delicious!
Thanks Debbie!
thank you so very much!! email has been replied too
Hi Debbie, yes I noticed 😉 Congratulations again! One Silver Pandora Candy Cane Dangle Charm coming your way! I read that you already have a charm bracelet. I hope the candy cane looks great on it 😉
This was awesome. I love chocolate cakes and collect their recipes, but this one is in my top five. I had trouble with the merengue, though. I couldn’t seem to whip enough air into it to get it to stiff peaks. Would I have better results with a heavy duty hand mixer than my stand up?
Thank you…LOVELY site and blog.
Nancy
Hi Nancy, I’m so glad you like the recipe! I used a cheap hand mixer fitted with the whisk attachment to make this candy cane frosting. Have you tried to make it with a flat beater? The whisk attachment incorporates more air into the meringue, so if you’ve used the flat beater I’d say switch to the whisk attachment. But bear in mind that this frosting just takes a really good beating. At least 10 minutes! 🙂
Oh thank you! I will use that hand mixer idea. I did use the wisk attachment for my stand mixer and I felt like it wasn’t doing what I needed. I only needed this excuse to get a hand mixer finally! Thank you, for all the wonderful recipes. This cloud cake was a giant success at christmass despite my “failure” frosting. 🙂
My hand mixer was only $10! 🙂