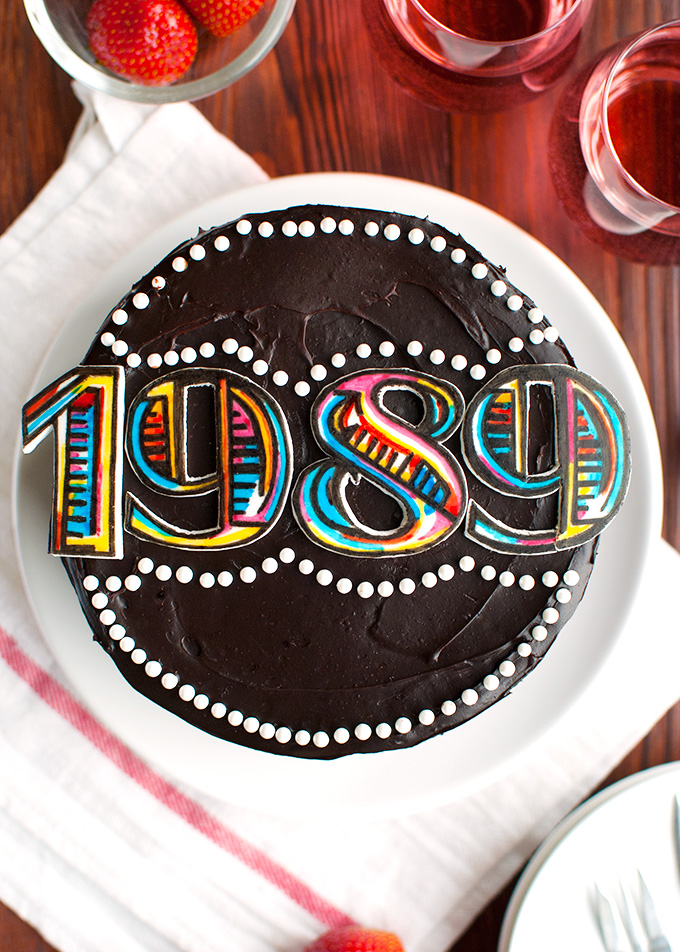
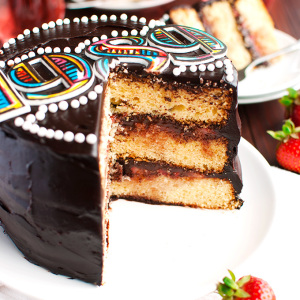
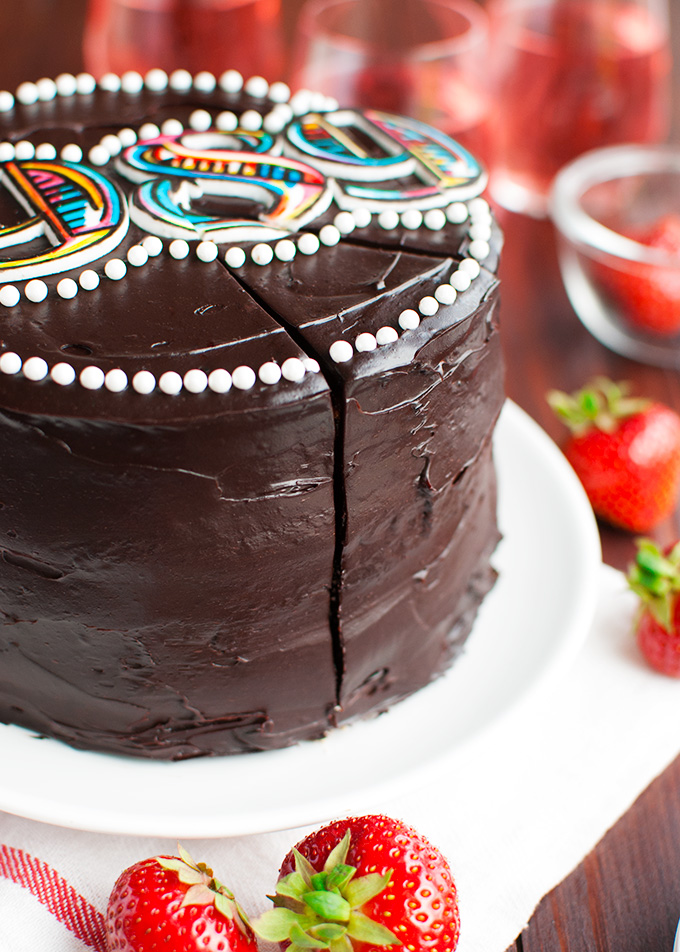
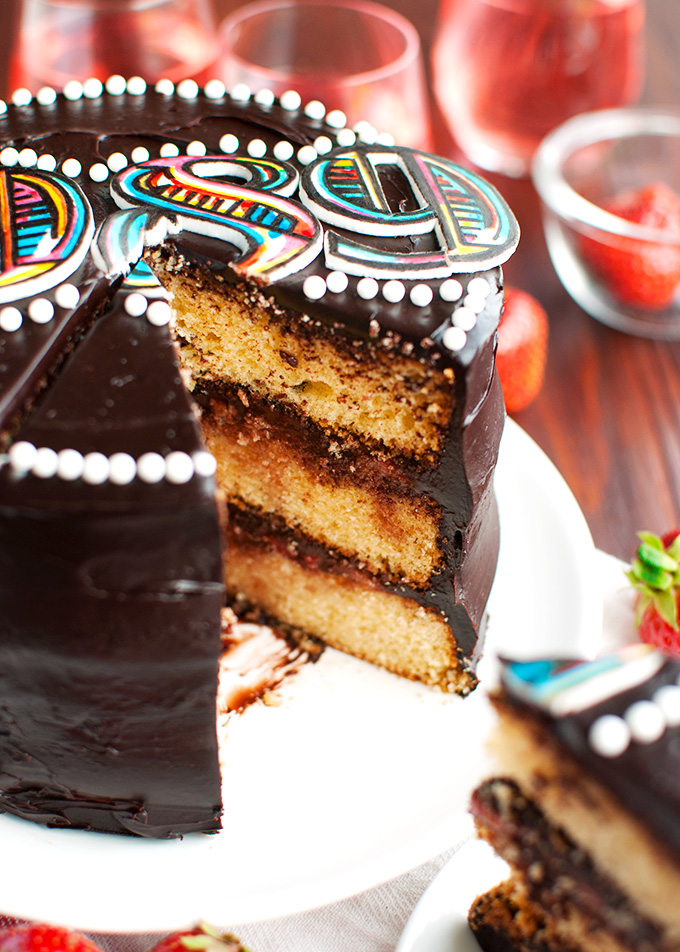
A light and spongy vanilla cake filled with juicy strawberries, strawberry syrup and an insane super dark chocolate frosting! And see those pretty fondant cut-out numbers up there? Hand-painted with edible watercolor? 1 – 9 – 8 – 9?
Wait, what? 1989? Yes! I made this cake for a Taylor Swift 1989 Tour pre-concert party! Because I’m a total Swiftie like that, just like my 10-year-old niece. You remember my Swiftie niece, right? In this post, you can see her then eight-year-old hand picking redcurrants of the stem. I infected her with the Taylor Swift virus years ago, back in the ‘Speak Now’ era, and she’s recently had her first guitar lesson from the Rocking Rebel, who taught her how to play ‘Shake it off’.
Anyway, last November, when Taylor had just announced her world tour on Twitter (Instagram? Tumblr? I can’t remember…) I immediately bought two tickets, one for me, and one for her, which I gift-wrapped in a pretty envelop with a pink bow. On my niece’s birthday, two days later, I first helped her make a cupcake candy village, and then, when it was time for presents, I gave her the ticket. You should have seen her face! I’m glad my brother caught it on camera…
Anyway, the concert is tomorrow, so I threw a (very small but very fun) Taylor Swift themed party last Wednesday. It was super fun. And we had cake!
Oh, by the way, if you, for some inexplicable reason, aren’t a Swiftie: this cake is also really good without the 1989 logo!
 The last time I went to a concert, it was to see this awesome Dutch band called Kensington, and I took the Rocking Rebel and my little sister. We had so much fun, even though my sister and I couldn’t see a thing because our view was blocked by loud, drunk dudes who kept throwing beer into the crowd. But the music was amazing! If you don’t know Kensington, you should really check out their newest single ‘Riddles‘. I’m telling you, the singer has the best voice ever! If only I could make my voice sound like that…
Anyway, my point is, I was wearing jeans, a T-shirt and a jacket at Kensington’s show. You know, I just showed up.
 Now, in case you didn’t know, you don’t just show up at a Taylor Swift concert. Oh no, you go all out!
So at the Taylor Swift 1989 Tour pre-concert party, my niece and I made bright pink tutu’s with glitter and glow-sticks hidden in the fabric (glow-in-the-dark skirts!) and customized white sneakers to go with them. Oh, and we bought glow-in-the-dark nail polish for the occasion. Because that’s what you do!
Of course, we made all that listening to 1989 and eating, um, not this cake, but cookies and lasagna (we had the cake later!). Which was also very good, because the Rocking Rebel made it (with a little help from my little sister) and he’s an awesome cook.
My favorite 1989 song? Blank Space. Be-duuuuh!
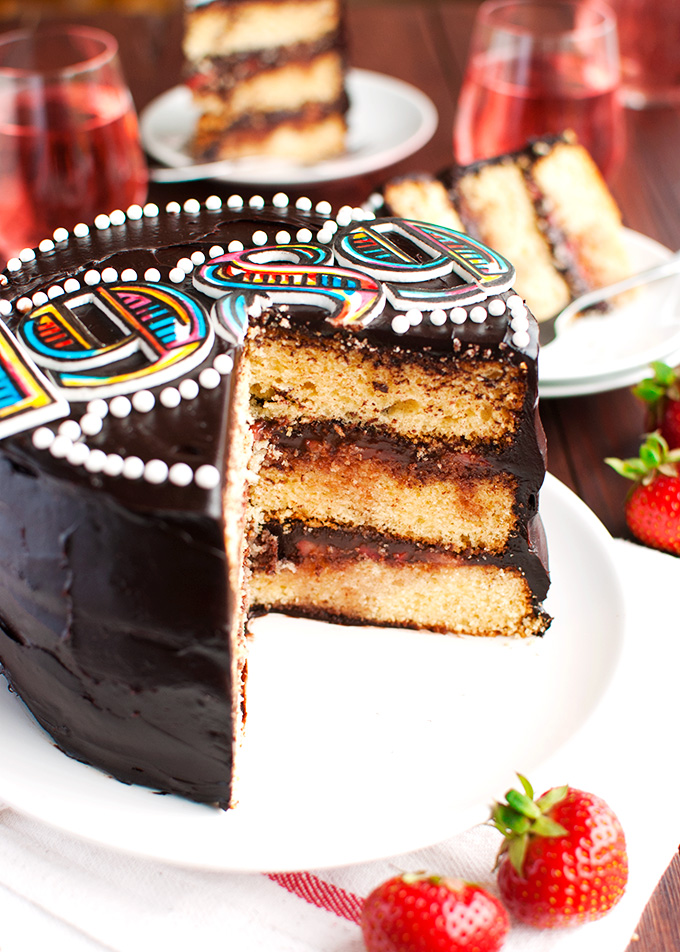 Anyway, since this is a baking blog, let’s talk about the cake!
Because I know Taylor loooves wintry goodies, like pumpkin cookies with dark chocolate chips and chai tea sugar cookies with eggnog cinnamon icing (yum!) I briefly considered turning this cake into either a pumpkin chocolate chip layer cake (with the same dark chocolate frosting) or a chai tea and cinnamon cake.
But guess what? It’s the middle of June! Even Taylor must be preferring strawberries over pumpkin right now, right?
Well, maybe not… I can’t know for sure. But hey, everyone I know loves strawberries, so I bet Taylor likes them to. Especially paired with fluffy vanilla cake. And super intense dark chocolate frosting.
(Oh, and Taylor, if you’re just so happen to be taylurking right now: if you do prefer a pumpkin or chai tea version of this cake, just let me know and my niece and I will make you one!)
Aaaanyway, this cake is surprisingly easy to make, but there are a few things you should know:
- It’s a 15-cm/6-inch cake. I only have 1 15-cm/6-inch cake pan, so I made 3 separate batches of batter (because it’s easy and it gives me a reason to lick the bowl 3 times!) and baked 3 separates cake layers. If you happen to have 3 15-cm/6-inch cake pans, you can make one big bowl full of batter and bake the cake layers at once. If you don’t, follow the instructions in the recipe notes.
- the strawberry filling is quite syrupy (aka: wet), so don’t try piling frosting directly on top of it. Instead, once you’ve added the strawberry filling to the first cake layer, frost the second cake layer and place it frosting-side down on top of the strawberry filling. That way, the frosting has something to stick to.
Oh, and of course…
3. This cake is goooooood!
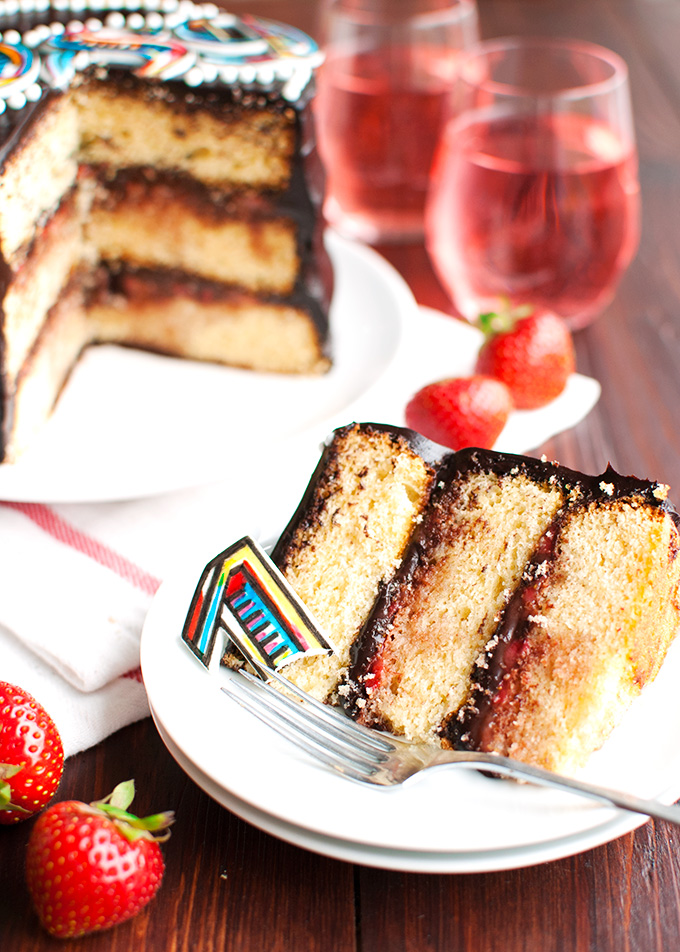 So enjoy, guys! Make this cake while dancing to ‘Shake it off’ or ‘Bad Blood’, or hey, while practicing your falsetto singing along with Muse’s ‘Mercy’ for all I care!
Just know that this cake means it’s time to party!
- 113g (or ½ cup) unsalted butter
- 300g (or 1½ cup) granulated sugar
- 150g (or 1¼ cup + 1½ teaspoon) Dutch-processed cocoa powder
- pinch of salt
- 180ml (or ¾ cup) heavy whipping cream
- 125g (or ½ cup) sour cream
- 1 teaspoon vanilla extract
- 185g (or ¾ cup + 1 tablespoon + ½ teaspoon) unsalted butter
- 185g (or ¾ cup + 3 tablespoon ) granulated sugar
- 3 large eggs
- 180g (or 1⅓ cup + 5 teaspoons) all-purpose flour
- 2¼ teaspoon baking powder
- ⅜ teaspoon baking soda
- ¼ teaspoon table salt
- 2 tablespoon + ¾ teaspoon buttermilk
- 1 teaspoon vanilla extract
- 150g (or 5.2 ounces) washed and hulled strawberries, sliced and cubed
- 20g (or 5 teaspoons) granulated sugar
- Fondant letters, sprinkles, edible glitter etc.
- In a medium-sized pan over low heat, melt the butter. Once melted, remove the pan from the heat. Add the sugar, cocoa powder and salt and stir with a rubber spatula until the mixture looks well combined (it will still be very grainy, but that’s normal).
- Add the cream and sour cream and, using a whisk, whisk until incorporated. Place the pan back on the heat (low) and heat gently for about 5 minutes, whisking continuously, until the mixture looks smooth and feels hot to the touch. You should no longer feel any sugar crystals when you rub a bit of the frosting between your fingers.
- Transfer the frosting to a heatproof bowl and whisk in the vanilla. Allow frosting to cool to room temperature, then place in the fridge for about 2 to 3 hours, or until spreadable.
- Preheat the oven to 175°C/350°F (standard oven setting) and butter three 15-cm (or 6-inch) cake pans (I personally only own 1 15-cm pan, so I made the cake layers separately. See the notes for tips*). Line the bottom of the pans with baking parchment and lightly dust the sides of the pans with flour. Set aside.
- In a medium-sized bowl, using an electric mixer (or in a stand mixer fitted with the whisk attachment) beat butter until pale and creamy, about 5 minutes. Add the sugar and mix until the mixture looks light and fluffy, another 5 minutes.
- Add the eggs one at a time, beating well after each addition, and mix until the mixture looks like thick buttercream, about 5 minutes. The mixture may separate, but if you just keep mixing it will come together again. Make sure to scrape the sides and bottom of the bowl every now and then with a rubber spatula.
- Add the flour, baking powder, baking soda and salt and stir with a rubber spatula until somewhat incorporated. Mix briefly with the mixer, about 30 seconds, then scrape the sides and bottom of the bowl again with your rubber spatula and mix for another 10 seconds.
- Add the buttermilk and vanilla and mix for 30 seconds, or until beautifully combined. Divide the batter evenly over the prepared cake pans, place on a rack in the middle of the oven and bake for 25 minutes, or until a tester inserted into the center of the cakes comes out clean.
- Allow the cakes to cool in the pans for 15 minutes, then turn out on a wire rack and allow to cool to room temperature before frosting. You can also make the cake layers a day ahead. In that case, wrap them tightly in plastic wrap once they’ve cooled to room temperature and place in the fridge until needed.
- Place strawberry pieces in a bowl and sprinkle over the sugar. Toss to coat the strawberries in the sugar, then place in the fridge for 20-30 minutes, or until the sugar has dissolved and the berries have started to release their juice.
- Place a dollop of frosting on a serving plate and place the FIRST cake layer on top. This will be the bottom cake layer. Fit a piping bag with a small, round tip and fill with about 50g of frosting. Pipe a thin border of frosting around the outer edge of the cake layer to create a barrier.
- Spoon half the strawberry mixture (syrup and all) in the center of the cake and arrange the strawberry pieces in a single layer, out to the edges of the frosting barrier.
- Using about 100g (or 3.5 ounces) of frosting, frost the top of the SECOND cake layer with an offset spatula (or the back of a spoon). Place this SECOND cake layer FROSTING-SIDE DOWN on top of the FIRST cake layer and press down lightly. Why frost the second cake layer? Because the strawberry filling is quite wet, and if you would try to frost the top of the strawberry layer, the frosting wouldn’t stick to it.
- Grab the piping bag again and, again, pipe a thin border of frosting around the outer edge of the SECOND cake layer, too.
- Spoon the remaining strawberry mixture (syrup and all) in the center of the cake and arrange the strawberry pieces in a single layer, out to the edges of the frosting barrier.
- Now, using about 100g (or 3.5 ounces) of frosting, frost the top of the THIRD cake layer with an offset spatula (or the back of a spoon). Place this THIRD cake layer FROSTING-SIDE DOWN on top of the SECOND cake layer and press down lightly.
- With the remaining frosting, crumb coat the top and sides of the cake (apply a thin coat of frosting), then place the cake in the fridge for about 2 hours to firm up.
- Finish frosting the cake with the remaining frosting and decorate as a desired. I used cut-out fondant shapes that I had painted with gel food coloring mixed with a little kirsch and allowed to dry.
- The cake is best served at room temperature. After you’ve finished frosting, the cake can be kept at room temperature for about 3 hours. For longer storage, place in an airtight container in the fridge for up to 2 days and remove from the refrigerator 3 hours before serving.
In that case, just follow the directions in the recipe, but use the following amounts of ingredients per layer: 62g unsalted butter, 62g granulated sugar, 1 large egg, 60g all-purpose flour, ¾ teaspoon baking powder, ⅛ teaspoon baking soda, pinch of salt, 2 teaspoons + ¼ teaspoon buttermilk, and ⅛ teaspoon vanilla extract.
** You can make both the frosting and cake layers the day before assembly. Store the cooled cake layers, wrapped tightly in plastic wrap, in the fridge until needed. Coved the bowl of cooled frosting with plastic wrap, too, and place int he fridge. Remove from the fridge 3 hours before you're ready to assemble.
