 Let’s talk kitchen experiments! And no, not those high school chemical experiments you can also do in the comfort of your own home. You know, the whole baking powder volcano thing or catching a rainbow in a glass… Sure, those experiments are very spectacular and pretty, but it’s not what I want to talk to you about. No, let’s talk the kind of kitchen experimenting that most of us start with as soon as we leave our parent’s house.
When I moved out of my mom’s home, I already knew a lot about baking. Hey, I had been doing it for years! Ever since I was a little girl! Cooking, on the other hand, is a whole different ball game. That’s why there are pastry chefs and chef chefs… When I left home, I could already make a killer risotto, a pretty decent lasagna, soup (because there’s hardly anything to it) and of course a basic spaghetti bolognese.
But man, there have been some huge kitchen failures ever since I started cooking on a regular basis, ranging from burned potatoes and undercooked meatballs (the more obvious ones) to weird dishes which, for no obvious reason, just refused to be tasty, such as an omelet with smoked salmon and a soupy veggie lasagna…
I mean, how can you mess up an omelet?
 However, just because I already knew baking when I left my mom’s place doesn’t mean that I never messed up a cake or pie. Learning is all about making mistakes, you know. And I have made a lot of baking-related mistakes in my time!
When I was little, we had an oven the size of a purse. Back then, I was really good at burning things. Cakes, pies, cookies, anything… Blame it on the oven or on the fact that I was seven and we didn’t have a kitchen timer. Not that my family seemed to mind a slightly burned pie crust very much… A few years later, we have moved on to a bigger oven and I turned out to have a knack for setting the oven temperature just a little too high, resulting in dry cakes. That’s when I learned how important it is to take a little time to get to know your oven.
Seriously, channel your inner oven whisperer, it’s totally worth it…
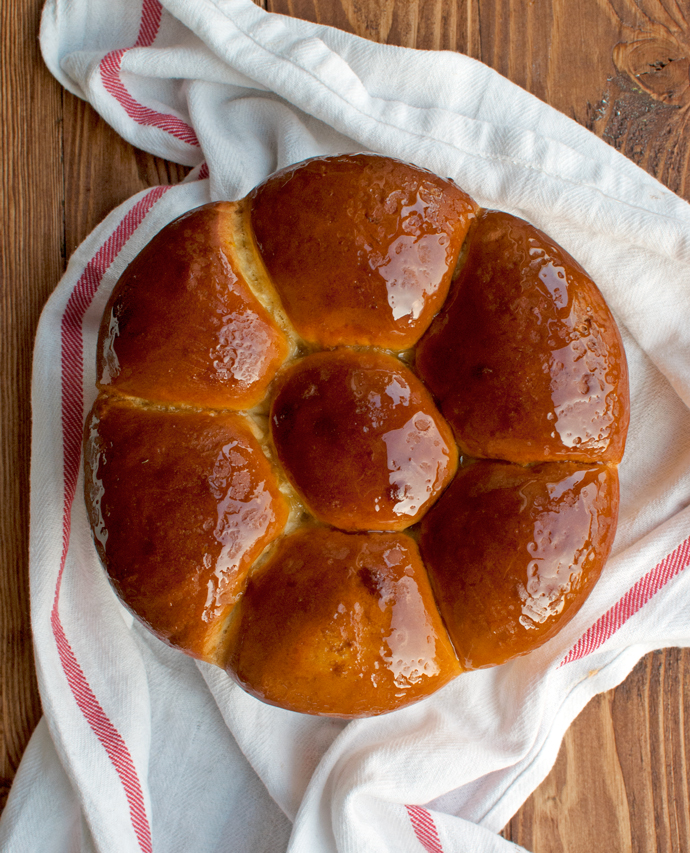
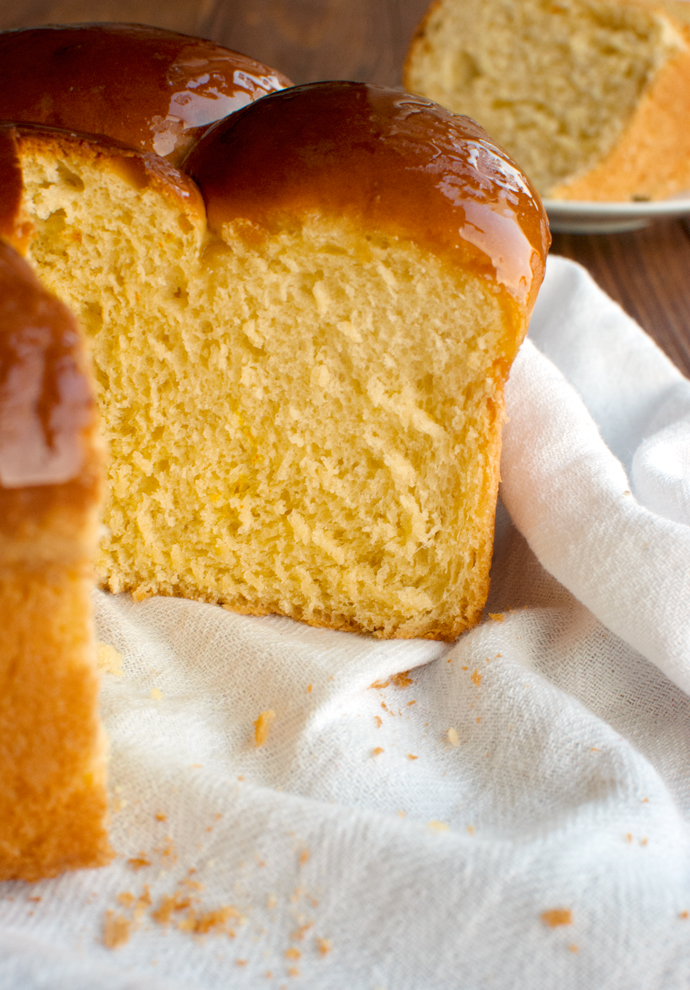
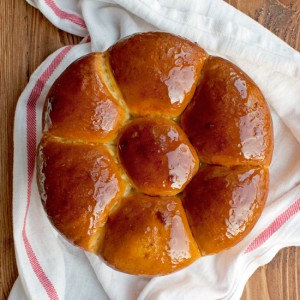
Anyway, fast forward to today: here I am, hardly burning anything any more! Coming up with recipe after recipe that actually works! I’m particularly proud of this sweet bread with honey and saffron. It’s amazing! I didn’t know if the recipe would work, because I haven’t experimented a lot with yeast breads, but this is definitely an example of a surprisingly fruitful kitchen experiment! Not only does this bread has a soft, fluffy, challah-like texture, it is also incredibly delicious! Sweet, but not too sweet. With delicate honey and saffron notes and a sticky honey glaze! It’s perfect for Easter, actually. That’s why I made it. Easter is just around the corner! I have already painted hopping plastic eggs with my 4-year-old nephew and my 3 and 1-year old nieces!
 So how did I make it? Well, I just adapted my recipe for cinnamon buns a bit! I omitted the cinnamon filling, added a little more flour, some honey and saffron to the dough, enriched the dough with an egg yolk and tadaa! A gorgeous, fluffy sweet bread!
Just look at that crumb!
Enjoy!
- A pinch of saffron
- 240ml (or 1 cup) of regular milk
- 55g (or ¼ of a cup) unsalted butter
- 125g (or 6 tablespoons) honey
- 1 tablespoon granulated sugar
- 1¼ teaspoon active-dry yeast
- 415g (or 3⅓ cup) all-purpose flour
- 25g (or 3 tablespoons) all-purpose flour
- ½ teaspoon baking powder
- ¾ teaspoon table salt
- 1 egg yolk
- 2 tablespoons of honey
- Bring about a cup of water to a boil. Add the saffron to a small bowl or cup and add a tablespoon of boiling water. Set aside to soak.
- In the meantime, make the starter. In a medium-sized pan, combine the milk, butter, honey and sugar. Gently heat over medium-high heat, stirring until the sugar has dissolved and the butter has melted. Take the pan off the heat and leave to cool until the milk mixture is warm and no longer hot. Yeast doesn’t do hot, so a good way to test whether the milk is cool enough, is just dipping your finger in it. If you find it pleasantly warm, yeast will like it too.
- Sprinkle the yeast over the surface of the milk mixture and let it ‘bloom’ (aka: get soggy and wet and a little bubbly). Add the saffron mixture and stir briefly to combine, then add the flour and stir together with a fork, cover with plastic wrap and leave to rise in a warm place for about 1-1,5 hour, or until the dough has doubled in size.
- Finish the dough. In a small bowl, stir together the flour, baking powder and half the salt. Add it to the dough in the pan and knead with your hands to incorporate the dry ingredients into the dough. Place the dough in a medium-sized bowl.
- Beat the egg yolk with the remaining salt and add it to the dough. Knead to incorporate. The dough will be quite sticky. Dust your countertop with flour, plop the dough on top of it, dust the dough with a little more flour and knead until the dough is smooth and no longer sticky. It’s okay to dust the dough and countertop with flour every now and then, but don’t add too much flour, as this will affect the texture of the bread. I lightly dusted with flour four times. After about 5 minutes of kneading (and the 4 dustings of flour) the dough shouldn’t be sticky anymore.
- Butter a 20-cm or 8-inch round cake pan with butter and divide the dough into 7 equal chunks. Roll each chunk into a ball and arrange them in the baking pan, one dough ball in the middle, the other six in a circle around it (but place the middle ball in last). The dough balls should be touching each other. Cover loosely with plastic wrap and leave to rise until doubled in size, about 1½ hour. Every half hour or so, check on the dough to make sure it doesn’t touch the plastic wrap. I usually take the plastic wrap off as soon as the dough has risen high enough to just touch it to allow the dough to rise over the top of the pan.
- While the dough is rising, preheat your oven to 180°C/360°F (standard oven setting). Once the dough has doubled in size, place the pan on an oven rack and place the rack one ridge under the middle of the oven. Bake for 30 minutes. After 15-20 minutes, loosely place a piece of aluminum foil on top of the bread to prevent the top from browning too much.
- Once the bread is done, make the glaze. In a small saucepan, gently heat the honey until loose and runny, then brush the top of the warm bread with it. Allow the bread to cool on a wire rack before cutting into it. Enjoy!