 This recipe has been featured on Serious Eats.
Okay, so by now I’m sure everyone has tried to make those amazing brown butter cupcakes with brown butter buttercream I posted a few days/weeks/how-long-has-it-been ago. And if you haven’t already made them, add it to your to-do list right now. Like: now! They’re amaaaazing!
Anyway, because I’m currently in love with all things brown butter, I made another brown butter cake. Well, in all fairness, I made this one for Serious Eats. But hell I’m going to share it here anyway! It’s too good not to… So. Brown butter cake. I know, I know… I’ve made brown butter cake before. With butter milk. And a little brown butter boost. Well, this cake is different. It’s more like a pound cake. It’s more buttery. Which means more brown butter flavor in every bite. Which also means there’s no need to boost the butter for maximum brown butter deliciousness!
Aka: this cake is a lot easier than my last brown butter cake! Plus, my last brown butter cake had a vanilla glaze and this one is topped with an insane brown butter frosting. It’s the best!
But for those who have never made a brown butter cake before (what did I just tell you about those cupcakes?), let me explain a little more about the magic of brown butter. In cakes, that is… You know how the edges of the cake are always a little more toasty and browned than the inside? Well, if you add brown butter to your cake batter, instead of the regular yellow stuff, it gives every single crumb of the cake that toasty, buttery, slightly caramelized flavor. Like cake on steroids!
Wait, did I just say that…?
 Okay, so like I said, it’s super easy to make. The first thing you’ll need? Brown butter. Kind of obvious. To make brown butter cake you’ll need brown butter. Like the rest of this cake, brown butter is super easy to make. Just grab some regular, unsalted butter, plop it into a saucepan, heat until the milk solids in the butter turn a gorgeous golden brown and your kitchen starts to smell like toasty hazelnuts, take the butter off the heat, allow it to cool and you’re done!
Super duper easy!
 For a more detailed how-to, check out my post on How to Brown Butter. It has pictures!
Oh, by the way, make sure to chill the butter thoroughly after you’ve browned it. This step it super important! Once firm, the butter then needs to be resoftened at room temperature for 30 to 45 minutes before you use it to make the cake.
Chilling the butter and then resoftening it may seem like an unnecessery, time-consuming step, but keep in mind that the temperature of the softened butter directly affects the structure of the cake. As you cream butter with sugar in a mixer, the butter traps air bubbles that form the basis of the cake’s crumb. If the butter’s too hard it won’t cream right; if it’s too soft and greasy, it won’t form those bubbles. In fact, the butter should still be a bit firm, with a temperature of about 20°C/68°F, to get the best structure…
So not like this… This is a photo of the butter straight from the fridge…
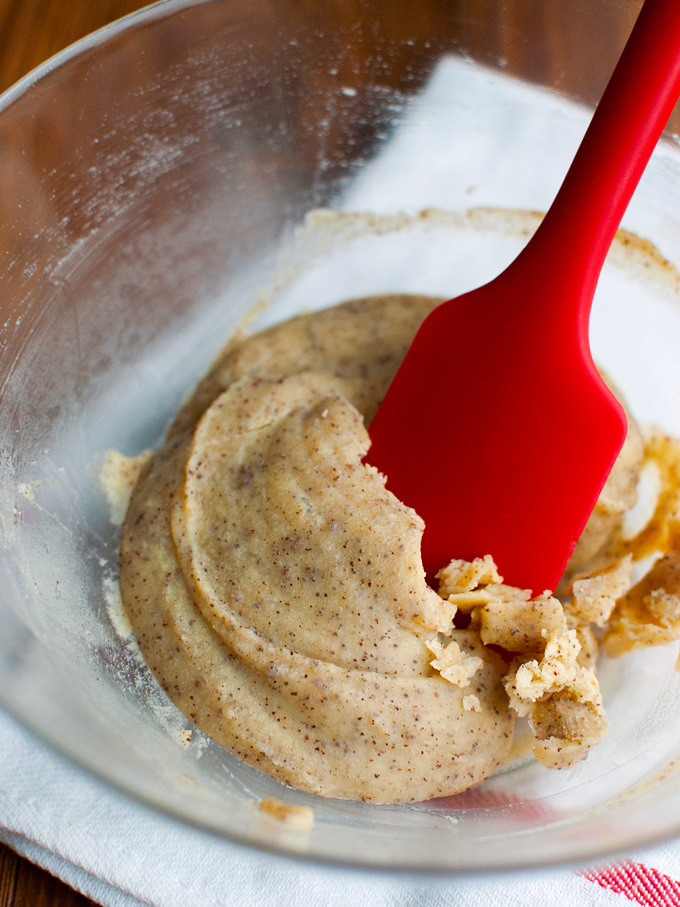 After the brown butter has softened to room temperature, getting this cake into the oven is peanuts. Just beat the butter in an electric mixer until creamy, mix in sugar, add eggs, a little milk and vanilla, then fold in flour, baking powder, and salt. After that, you bake the cake until a toothpick inserted into the center comes out clean.
Classic cake method…
By the way, brown butter can kickstart the browning process of a cake in the oven, so I suggest covering the cake loosely with aluminum foil after the first 30 minutes of baking to prevent the cake from browning too much.
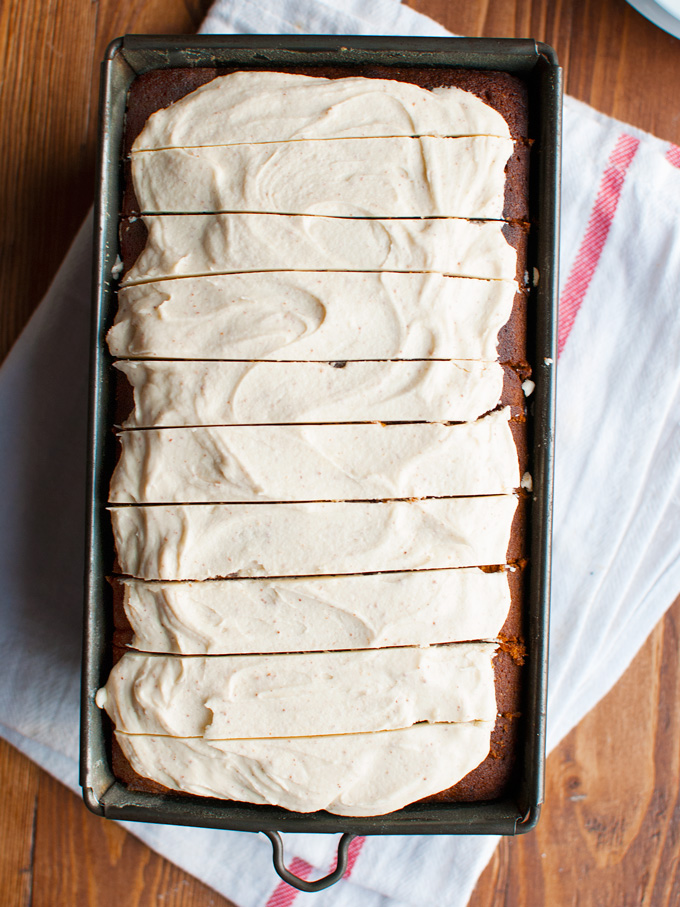
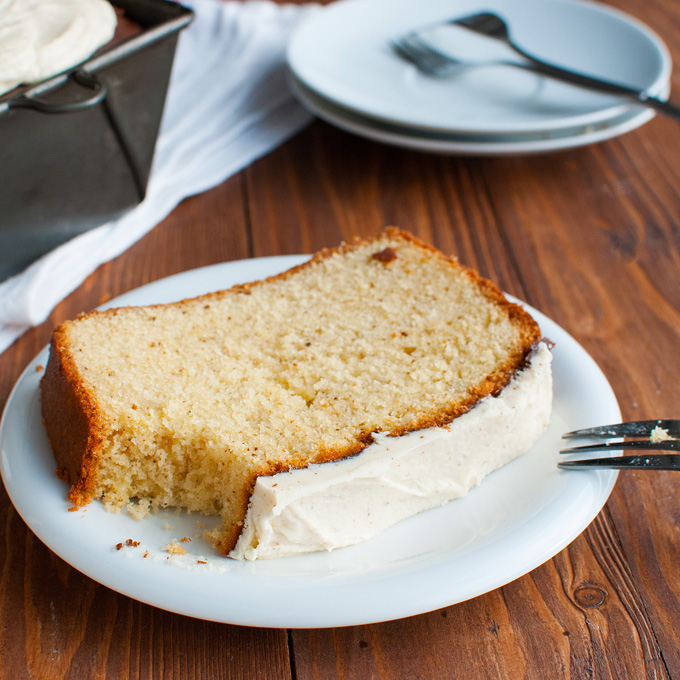
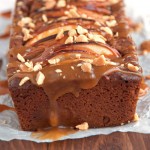
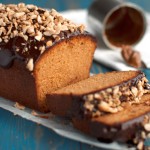
See those brown flecks in the cake? That’s all that brown butter! Deeeeelish!
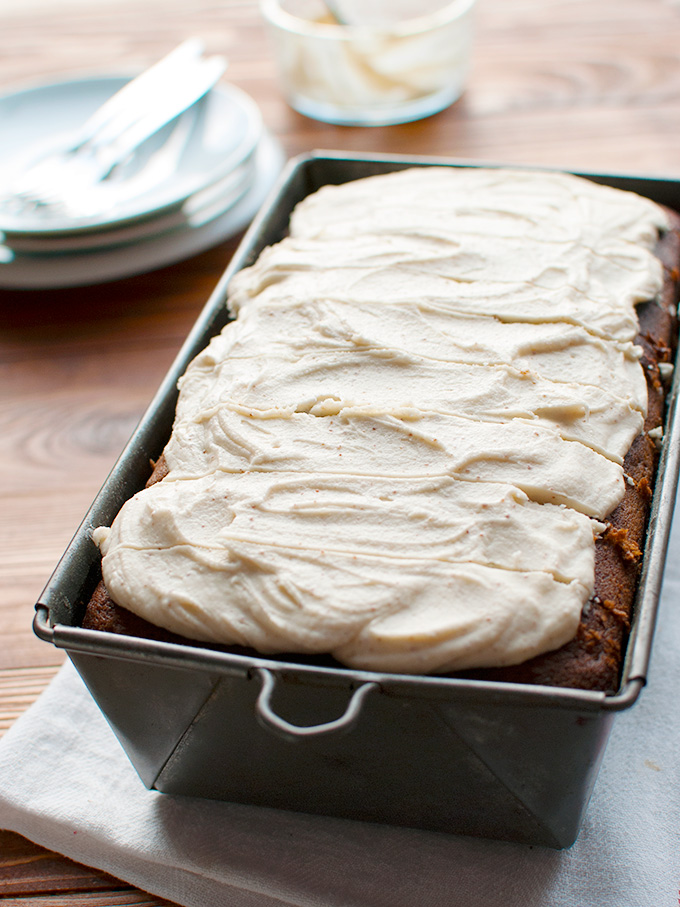
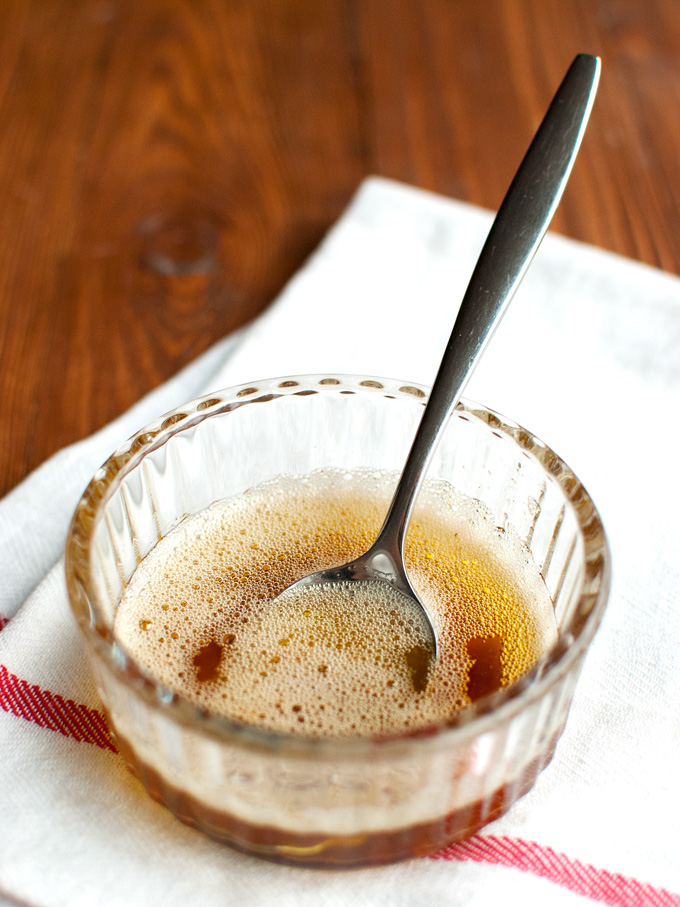
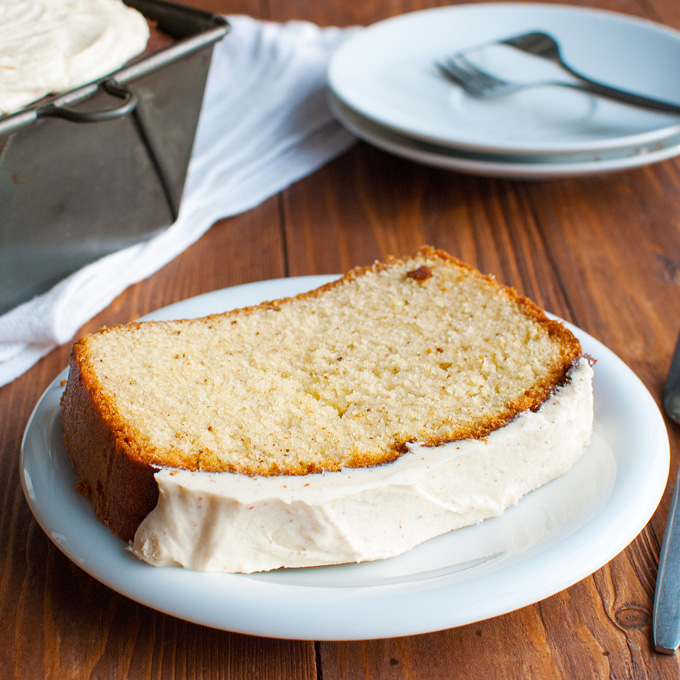 Which brings me to the brown butter frosting. It’s a lot different than the brown butter buttercream I made for the brown butter cupcakes… Just a mixture of more brown butter (freshly browned and hot from the pan), powdered sugar, a splash of water, and vanilla.
I only use a few drops of vanilla in the frosting, but even this small amount of vanilla dramatically deepens the warm brown butter notes of the frosting so if you have it don’t forget to put it in.
A few words on the frosting though. It’s a water-in-fat emulsion. Like most frostings. This means that it can separate. If this happens, just keep whisking/mixing like you mean it and it will come together again. Slather it on top of the cake, place the cake in the fridge for about 10 minutes to allow the frosting to set and…
… serve!
 Seriously guys, that frosting is crazy!
It’s a great on-the-go kind of cake too! Sturdy, generous and delicious…
Oh, and if you’re a pinner, don’t forget to pin!

- 280g (or 1¼ cup) unsalted butter*
- 290g (or 1⅓ cup + 2 tablespoons) granulated sugar
- 5 large eggs, at room temperature
- 290g (or 2⅓ cup) all-purpose flour
- ½ teaspoon table salt
- 2½ teaspoons baking powder
- 110ml (½ cup minus 2 teaspoons) whole milk
- 1 teaspoon vanilla extract
- 55g (or ¼ cup) unsalted butter**
- 125g (or 1 cup) powdered sugar
- 5 teaspoons hot water
- 2 drops of vanilla extract
- plop the butter in a heavy-bottomed and preferably light colored saucepan. The heavy bottom ensures the butter heats evenly, while the light color enables you to monitor the color of the butter as it browns. Heat the butter gently over low heat, stirring occasionally, until melted.
- Once the butter has melted completely, allow it to come to a rolling boil. As it boils, the butter will bubble and splatter dramatically, so you may want to place a splatter screen over the pan. Give the bubbling butter a good stir with a rubber spatula every now and then, scraping the sides and bottom of the pan as you go.
- After about 5 minutes, the biggest bubbles will disappear and the butter will start to foam. This is when it the milk solids in the butter will caramelize, so keep a close eye on the butter!
- You can tell the butter is browning because it will start to smell nutty and toasty.
- Because of the foam, it may be difficult to determine whether the butter has browned enough to your liking, even if you are using a light colored pan. To check the color of the butter, try clearing away some of the foam with a spoon or take the pan off the heat and use a soup ladle to ladle a little of the butter in a glass. The milk solids in the butter (little dark specks) will have turned a dark golden brown when it's ready.
- Once you’re happy with the caramelization, pour the butter in a heatproof bowl, scraping the milk solids into the bowl with the butter, and give it a good stir to cool the butter slightly and stop the caramelization process. If you were to leave the butter in the pan, the residual heat from the pan would continue to cook the butter, which may cause the butter to burn.
- Allow the butter to cool to room temperature, stirring it every now and then with a rubber spatula, then place it in the fridge until cold. Once cold, resoften the butter at room temperature for 30-45 minutes.
- Adjust oven rack to lower middle position and preheat the oven to 175°C/350°F. Lightly butter a 21x11-cm/8x4.5-inch (2-liter/2-quart) loaf pan and dust is with a tablespoon of flour.
- In a large bowl, beat the brown butter with an electric mixer until creamy and lightened in color. Add the sugar and continue to beat for 2-3 minutes, until the mixture looks fluffy. Make sure to scrape the bowl with a rubber spatula every now and then.
- Once the mixture is fluffy, add the eggs one at a time, mixing well (about 2 minutes) after each addition. Again, scrape the sides and bottom of the bowl every now and then.
- Once all the eggs have been added to the batter, combine flour, salt and baking powder in a bowl and stir to combine. Combine the milk and vanilla in another bowl.
- Add half the flour mixture to the batter and fold with a rubber spatula until somewhat incorporated. Mix with the mixer until the batter looks smooth. Add the milk mixture and mix with the mixer until combined and mixture looks smooth. Add the remaining flour mixture and mix well, 1-2 minutes, until the mixture looks smooth. Make sure to scrape the sides and bottom of the bowl with a rubber spatula every now and then as you mix.
- Pour the batter into the prepared cake pan. Rap the pan sharply on the counter to remove any air bubbles.
- Bake the cake for 30 minutes. After 30 minutes of baking, cover the top of the cake loosely with aluminum foil to prevent the cake from browning too much. Bake for another 20 minutes, or until a tester inserted into the center of the cake comes out clean. Remove from the oven and allow the cake to cool for 15 minutes in the pan before turning cake out on a wire rack. Allow cake to cool to room temperature before frosting.
- Following the same process as described in steps 1-6 of the 'Start by browning the butter' section of this recipe, brown the butter in a small saucepan.
- Add the powdered sugar to the hot, melted brown butter. Whisk until incorporated. Add the water one teaspoon at a a time (mixing well after each addition). Add vanilla and whisk until the mixture looks smooth. You're making a water-in-fat emulsion here, so it's important to add the liquids slowly and to whisk well. If the mixture separates, whisk until the mixture comes together.
- Using the back of a spoon, slather the frosting on top of the cake. Place the cake in the fridge for about 20 minutes, or until the frosting has firmed up. Cut into slices and serve.
- Cake keeps, stored in an airtight container in the fridge, for up to 3 days.
** or 45g hot melted brown butter


This is really, REALLY, amazing!
The smell of the Beurre Noissette was delicious, the flavor of this cake is SO different than using non-noisette butter! I couldn’t believe it.
Is this your original recipe?
Hi Alejandra, I’m so glad you like this cake! And yes, it’s my original recipe 🙂
Well congratulations! It is indeed amazing.
Oh the butter ,oh the butter!I now have plans for this aftuj noon!
*afternoon*
I got it 😉