 Hey guys, what’s happening? Christmas, of course. That’s what’s happening.
And this year, Christmas is just a bit more special: it’s Baby Boy’s first Christmas! He’s exactly five weeks old today and as I’m typing this he’s curled up against my chest in a sling like a little chipmunk in hibernation. He’s so cute!
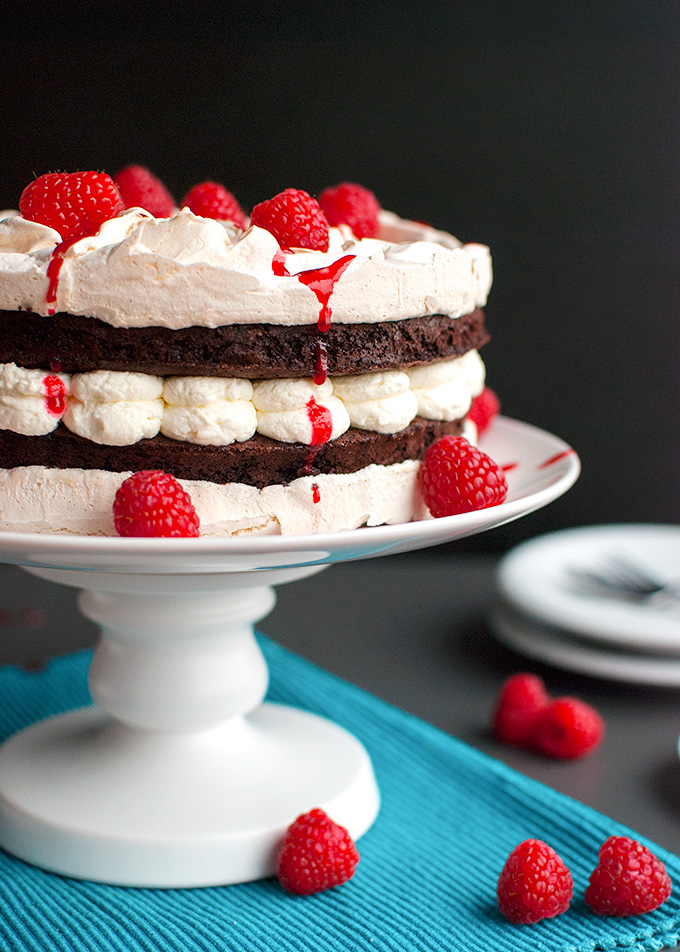
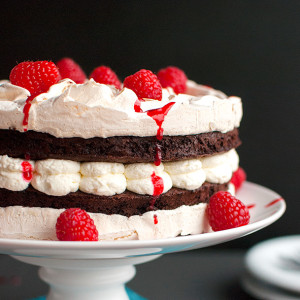
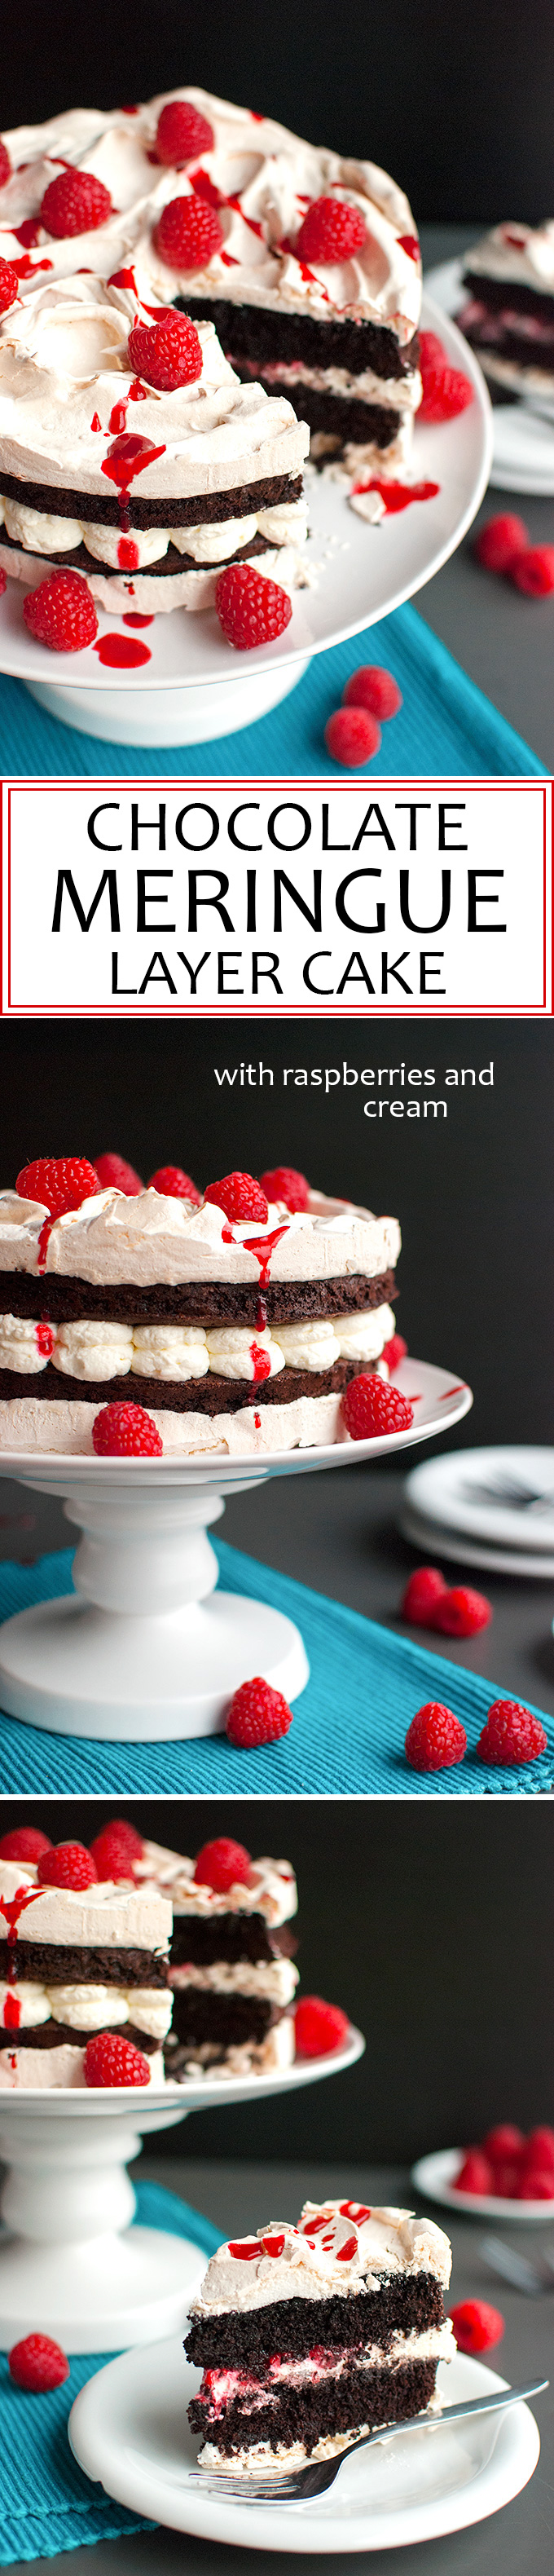
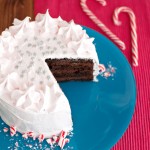
But anyway, you’re here for great recipes, right? This cake is just that. I made this one for Serious Eats about a year ago, but it’s still a winner! I first had this cake in a little bakery just around the corner from where I live and it was love at first sight. I mean, what’s not to love? Moist, dense chocolate cake layers topped with delicate, crispy meringue and filled with whipped cream and raspberry sauce. Does it get better than that? Unfortunately, the bakery is only open on weekends, so sometimes I had to wait days to get my chocolate-and-meringue cake fix… Obviously, I had to come up with my own recipe.
And just between you and me (and, um, everyone who reads this blog) I secretly prefer my version over the one they sell at the bakery 😉
 Let’s start with those beautifully dark chocolate cake layers. They’re about as dark as an actual bar of dark chocolate and they taste almost the same! As in: super chocolatey.
In this recipe, I only use Dutch-processed cocoa powder. No chocolate. When I developed this cake recipe, I tested it against several cakes made with a combination of melted chocolate and cocoa powder and frankly I didn’t think the chocolate made a difference, so I left it out. However, I do add half a teaspoon of instant coffee granules. It really enhances the chocolate flavor, but if you don’t have some, by all means leave it out. The cake will still taste amazing!
The cake layers are really easy to whip up, by the way. Just a matter of throwing stuff together… First, mix sugar, oil, egg and vanilla together. Add wet and dry ingredients and whisk until smooth. I love easy recipes like that!
Once the batter is smooth, divide it between two 20-cm/8-inch springform pans that you’ve lined with baking parchment. The parchment is really important, as you need to bake the meringue layers on top of the cake layers and the parchment prevents the meringue from sticking to the pan, so that you can remove the layers from the pan without damaging the fragile meringue crust. Just a little tip: buttering the springform collar before lining it with parchment helps the parchment to stick to it.
Oh, and if you only have one 20-cm/8-inch springform pan, just bake the layers separately (which unfortunately is a bit more time-consuming) or just halve the recipe to make just one cake-and-meringue layer and top it with cream and berries.
 Like I said, the meringue layers are baked directly on top of the cake layers. Don’t worry about the cake being baked twice. Meringue is actually a really good insulator because it has a lot of air in it, so the cake layers won’t become dry.
Once you’ve baked the cake layers, first they need to cool completely to room temperature before you can top them with meringue. This is really important. If you were to spoon the meringue onto the cake layers when they’re still hot or even warm, the meringue won’t become crispy, but will remain soggy and chewy instead. So make sure those cake layers have cooled completely before proceeding with the recipe.
This is a French meringue, by the way. For tips and tricks on how to make it, check out my post on French meringue.
Once your happy with the meringue, divide the meringue evenly over the cake layers. Use the back of a spoon to smooth the meringue in one of the pans and swirl the meringue in the other pan to form peaks. The swirly layer will become the top of the cake. The other layer will get smushed underneath the whole thing.
The meringue layers are baked for 40 minutes at 120°C/250°F. Beware of oven hot spots! I place my springform pans all the way in the back of the oven, because apparently the back of my oven is a little cooler. Unfortunately, all ovens are different, so I can’t really tell you where to place yours. Just keep an eye on the color of the meringue. It shouldn’t brown. If it does, move the pan to where the meringue hasn’t browned. After 40 minutes in the oven, the meringue should be crisp and beautiful. You can check for doneness by gently tapping the meringue with your fingernails. It should sound hollow.
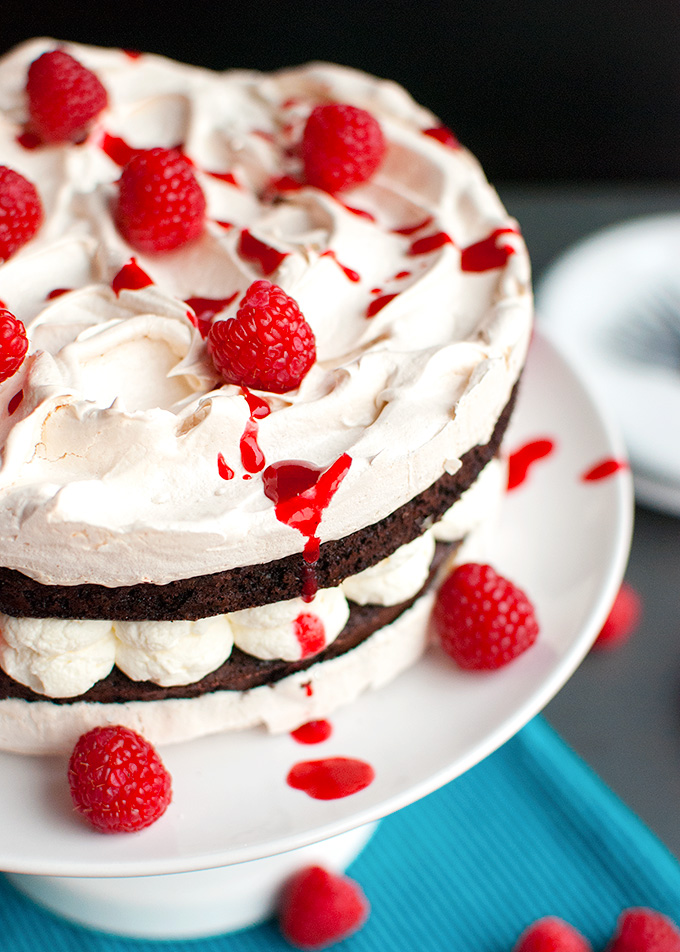
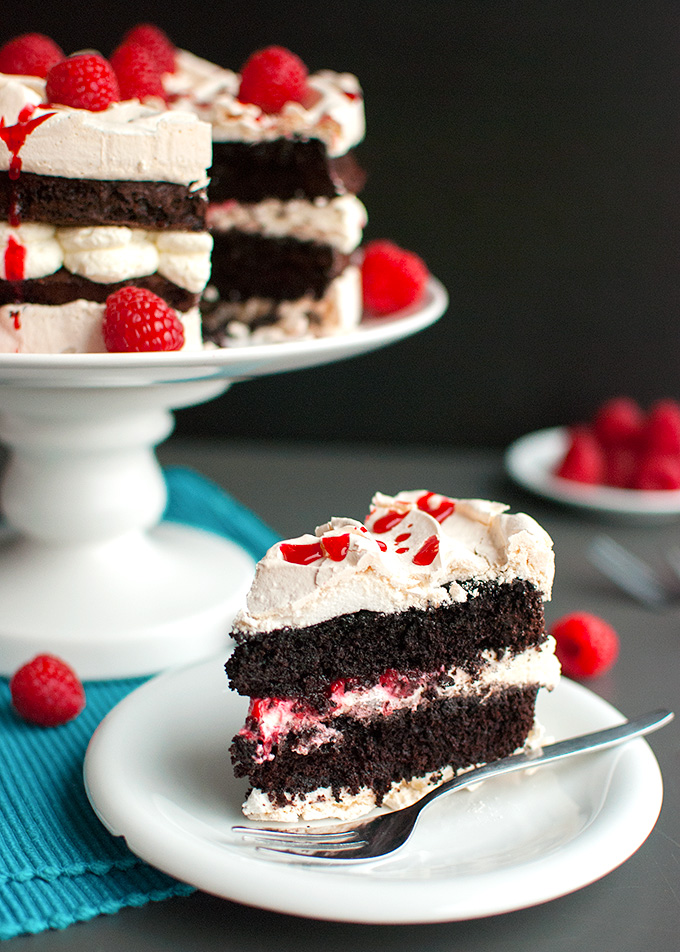 Once the cake layers are made, assembling this cake is a breeze. Just a matter of placing the cake layer with the flat meringue top meringue-side down onto a serving plate or cake stand, plopping whipped cream and a gorgeously vibrant raspberry sauce (made with frozen raspberries) on top and topping it with the second cake layer. You can use a piping bag to make it even prettier if you want to, but it’s not necessary. Just use a spoon if you don’t like piping or if you don’t have a piping bag. Scatter a few raspberries over the top of the cake and you’re done! Perfect! Easy! And really pretty!
In other words, perfect for the holidays. Merry Christmas, everyone!
- 145g (or ½ cup + 3 tablespoons + 2 teaspoons) granulated sugar
- 120g (or ½ cup + 2 teaspoons, packed) light brown sugar
- 60ml (or ¼ cup) canola or sunflower oil
- 1 large egg
- ¼ teaspoon vanilla extract
- ½ teaspoon instant coffee granules
- 30ml (or 2 tablespoons) hot water
- 120ml (or ½ cup) buttermilk
- 130g (or 1 cup + 2 teaspoons) all-purpose flour
- 90g (or ¾ cup + 1 teaspoon) Dutch-processed cocoa powder
- ¾ teaspoon baking powder
- ¾ teaspoon baking soda
- ⅛ teaspoon table salt
- 2 large egg whites (about 65g, or ¼ cup + 1 teaspoon)
- 125g (or ½ cup + 2 tablespoons) granulated sugar
- ½ teaspoon vanilla extract
- 115g (or 4 ounces) frozen raspberries
- 20g (or 5 teaspoons) granulated sugar
- 1 tablespoon water
- 180ml (or ¾ cup) heavy whipping cream
- 30g (or 2 tablespoons + 1 teaspoon) granulated sugar
- 125g (or 1 cup) fresh raspberries
- Adjust the oven rack to middle position and preheat oven to 175°C/350°F (standard oven setting). Line two 8-inch springform pans with baking parchment (buttering the springform collar will help the parchment stick to the sides of the pan).
- In a medium-sized bowl, combine the sugars, oil, egg and vanilla. Using a mixer fitted with the whisk attachment, mix until the mixture looks well combined, about one minute.
- Dissolve the coffee granules in the water, then stir in the buttermilk. Set aside.
- In a small bowl, stir together the flour, cocoa powder, baking powder, baking soda and salt.
- Add the wet and dry ingredients to the egg and sugar mixture. Gently stir the ingredients together, using a rubber spatula or a spoon. Once you’ve incorporated most of the dry ingredients, mix briefly with the mixer until the batter is smooth, about 15 seconds. Using the back of a spoon, divide and spread the batter evenly in and over the prepared pans.
- Bake the cakes for 20 minutes, or until a tester inserted into the centre of the cakes comes out clean. Remove from the oven and allow the cakes to cool to room temperature completely in the pans. This should take about 30-60 minutes. Don’t skip this step! It’s very important that the cakes are cool, otherwise the meringue won’t crisp up! Make sure the bottom of the springform pans and the top of the cakes feel cool to the touch before you proceed with the recipe.
- Combine frozen raspberries, sugar and water in a small saucepan. Heat over low heat, stirring until the sugar has dissolved and the berries have started to release their juices. Crank the heat up to medium-high and allow to come to a boil, stirring occasionally.
- Cook for two minutes over low heat, stirring occasionally. Remove from heat and allow the raspberry sauce to cool completely.
- Adjust oven rack to middle position and preheat oven to 120°C/250°F (standard oven setting).
- Add the egg whites and vanilla to a spotlessly clean, medium-sized bowl. Using a mixer fitted with the whisk attachment, beat the egg whites until they hold soft peaks. With the mixer still running, gradually add the sugar, one tablespoon at a time. Once you’ve added all the sugar, keep mixing for another 5-10 minutes, or until you can no longer feel any sugar crystals when you rub a bit of the meringue between your fingers and the meringue can hold stiff peaks.
- Divide the meringue evenly over the cool cakes. Use the back of a spoon to push the meringue against the lined collars of the springform pans. Use a spoon to smooth the meringue in one of the pans, and to swirl the meringue in the other pan to form peaks.
- Bake for 40 minutes or until dry and crisp. An easy way to check whether the meringue is done, is gently tapping it with a fingernail; the meringue should sound hollow.
- Remove the pans from the oven and allow the cakes to cool for 10 minutes in the pans. After 10 minutes, carefully remove the springform collar and peel away the baking parchment from the sides of the cakes. There is no need to remove the bottom part of the pans yet. Allow the cakes to cool completely.
- Once the cakes have cooled, whip up the cream. In a medium-sized bowl, mix together the cream and sugar until the mixture holds stiff peaks.
- Place the flat meringue layer onto a cake stand or serving plate, meringue-side down.
- Fill a pastry bag fitted with an open tip with the whipped cream and pipe a ring of small mounds or dollops around the outer edge of the chocolate cake layer. Spread the remaining cream onto the center of the cake and spread it smoothly all over the top of the cake layer, out to the inner edges of the ring of whipped cream dollops.
- Spoon about three tablespoons of the raspberry sauce onto the center of the cake layer, on top of the smoothened whipped cream layer. Again, smooth over the top of the cake layer, out to the inner edges of the whipped cream dollops.
- Place the second cake layer cake-side down on top of the raspberry filling. Press down lightly. Strain the remaining raspberry sauce through a fine-meshed sieve and drizzle it over the top of the cake. Scatter a few raspberries on top.
- Serve at once, or refrigerate for up to eight hours in an airtight cake container. Remember that whipped cream doesn’t hold well.
Cake layers can be made a day ahead and stored (in the pans!) in an airtight container at room temperature.
Cake-meringue layers can be made a day ahead and stored in an airtight container at room temperature.
I suggest you make the raspberry sauce and cake layers a day ahead, so both can cool thoroughly overnight. The next day, whip up the meringue to finish the chocolate-meringue layers, then assemble the cake after the layers have cooled.


Hi Nila! I’m about to make this cake soon but I only have 9″ springforms or 8″ cake pans. Do you think it would be better to just make it in the 9″ springforms, or should I try to carefully use parchment lined 8″ pans? Any advice would be much appreciated 🙂
Hi Janet, have you considered converting the recipe? I wrote a post about how to do that. If you don’t want to convert the recipe, I think you can still make the cakes in the regular pans, but getting the cakes out of the pans after you’ve added the meringue might be tricky, because the meringue is so fragile. Another thing you could do, is line the cake pans (8-inch) with not just the regular parchment to prevent sticking, but also two baking parchment strips (there’s a picture of how to do this in this post) to help lift the cake out of the pan later. That way, you won’t damage the meringue layer when you turn the cakes out 😉